Like the other Memorex drives we've reviewed, the MRX-500N was very easy to install. From start to finish, the entire process took only a few minutes. After taking the drive out of the box, I left the jumper set to master and installed it on the secondary IDE chain by connecting the IDE cable and power connector. When I turned on the computer the BIOS detected it as a drive supporting UDMA 33. After making sure that the DMA was enabled in the Device Manager, I was ready to start installing the software.
Software Installation:
As I mentioned earlier, the MRX-500N comes with a CD full of software from Nero. If you have autorun enabled on your computer, the menu you see below will automatically come up when you insert the disc.
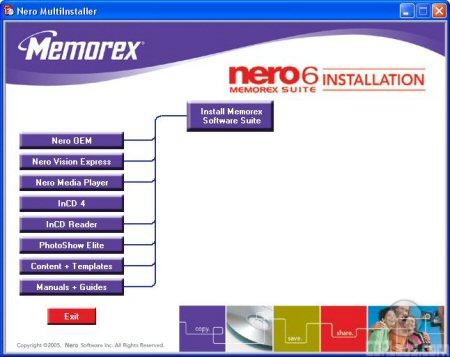
By now most people should be pretty familiar with this menu. From here you can choose to install the OEM version of Nero (Nero Express), NeroVision Express, Nero Media Player, InCD 4, the InCD Reader or PhotoShow Elite. Memorex gives you the option to install each component individually, or everything but InCD in one shot. Once you reboot, you'll be ready to start burning your own discs.

In case you run into trouble and need some help, Memorex has included a small "Software Guide." This guide includes some brief instructions on how to install and use the various applications included in the Nero 6 suite.Because the guide is fairly small, these instructions only go over the basic features of each application. If you need to go beyond the basics, additional documentation can be accessed through Nero's SmartStart launcher.
Documentation:
Most of the MRX-500N's documentation is located in the "Hardware Guide." While smaller than the ones included with Memorex's previous drives, this fold out guide is well laid out and contains a fair amount of information. It starts out by getting the user familiarized with their new DVD writer. The first section goes over the drive'sfeatures, system requirements and package contents.
From here, the guide jumps right into the physical installation of the drive. The instructions take the user step by step through the entire installation process and cover all the basics including how to set the jumpers, install the drive into an empty drive bay and hook up the cables. If you're not sure whether the drive should be set up as a master or slave, the guide also has a few example configurations along with their corresponding jumper settings. Last but not least, the guide finishes up with a few short sections on how to operate the MRX-500N and troubleshoot some of the common problems that people might experience.
As usual, Memorex has tried to make the installation process as painless as possible. If you need help for some reason, the documentation they've provided is quite good, even though it has been slimmed down some from their previous drives. With this in mind, the MRX-500N scores a 9 out of 10 for the installation portion of this review.