
Model: LG N1T1 1TB Super Multi NAS with DVD Rewriter
Manufacturer: LG Electronics
Provided By: LG Electronics USA
LG Electronics is one of Korea's oldest and most respected consumer electronics firms. Since the introduction of their first radio in 1959, the company has grown to become one of the world's top electronics manufacturers, offering everything from large home appliances to tiny mobile phones. LG is no stranger to the storage industry either. Working closely with companies like Hitachi, they've lead the way in this area, developing and manufacturing a wide range of optical storage products, including the industry's first "Super-Multi" drives.
 These days, LG has its sights set on the network attached storage market. Over the last year or so, the company has introduced a number of Super-Multi NAS devices aimed at home and small business users. One of the latest additions to LG's lineup is the N1T1. This single bay NAS device offers 1TB of storage as well as a built-in DVD writer. Along with the usual file and print services, the N1T1 features support for Apple's Time Machine, DLNA media streaming, torrent file sharing and the ability to backup data from CD's, DVD's and USB storage devices. Last but not least, the device can be configured for use as an external hard drive and DVD writer.
| LG N1T1 1TB Super Multi NAS with DVD Rewriter | |||||||||||||||||||||||||||||||||||||||||||||||||||
|
General Specifications
Super-Multi DVD Re-Writer
LAN Interface
USB Interface
Network File Services
Misc Features
|
Needless to say, this is only a taste of what LG's single bay NAS has to offer. To give you an idea of what to expect, we'll take an in-depth look at the N1T1's features and then put it through its paces to see how it performs. Does LG's new NAS have what it takes? Keep reading as we find out.
What's in the box?:

The N1T1 comes in a stylish white box about a third of the size that the N2R1 ships in. The front, back and sides of the box show the NAS from various angles and list many of its features. Inside the box you'll find the N1T1 as well as a pedestal, AC power adapter, USB cable, ethernet cable, quick installation guide, warranty information card and two CD's containing the bundled software and multimedia user guide.

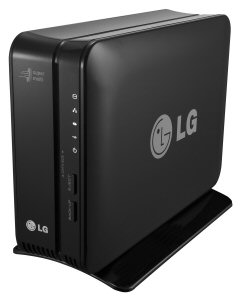
Physical Features:
The N1T1 is surprisingly compact considering it is packing both a hard drive and a DVD writer. The device measures 5.91 x 2.63 x 8.27 in (150 x 67 x 210 mm) and weighs in at 4.19 lbs with a hard drive installed. The N1T1's case is constructed out of lightweight, black plastic. The glossy finish looks great, but finger prints and smudges have a tendency to stand out.
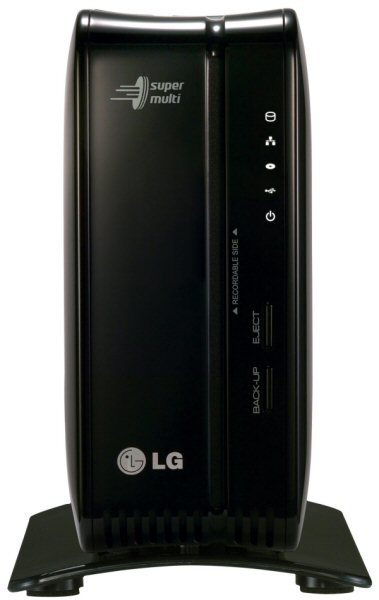
While lacking an LCD panel, the N1T1 has a series of LED's along the right hand side. These LED's are used to show the current state of the hard drive, network, optical drive and whatever USB device is plugged into the unit at the time. Below the LED's there are two buttons, which are used to eject an optical disc from the N1T1 and launch the USB and ODD backup functions.
The N1T1's optical drive is mounted vertically and utilizes a slot loading mechanism. To insert a disk, simply slide it through the slot on the front of the drive with the recordable side facing toward the LED's.

The rear of the N1T1 is pretty straight forward. Along with the DC power connection, there is a 50mm fan. This fan is temperature controlled and only spins as fast as needed to keep the system cool. Right above the DC power connection there is an ethernet port and a single USB port. The red button is used to power the N1T1 on and off.
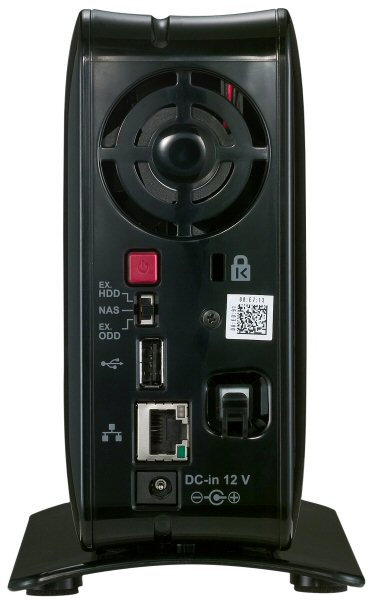
One of the more interesting features on the back of the N1T1 is the mode switch. Located right below the power button, this switch is used to change the function of the device from NAS to external hard drive or ODD.

The N1T1's hard drive is not removable. However, using the web interface, I was able to check and see what model was inside the device. Looking at the screenshot above, you can see that LG has used Hitachi's 1TB Deskstar 7K1000 (HDS72101) hard drive. This 3.5-inch drive features a SATA 3.0Gb/s interface, 32MB cache and a 7,200 RPM rotation speed.
The N1T1 is ready to go out of the box. Simply connect the included cables to the device and power it on. If the N1T1 is going to be used as an external hard drive or DVD writer, you'll also need to select the correct mode using the switch on the back.
Once the N1T1 is up and running, its network connection will need to be configured. If you have a DHCP server on your network and you know what IP the NAS is using, you can skip the next few steps and connect directly to the web menu. Otherwise, you'll need to pop the “LG Network Storage PC Software Installer” CD into your computer and install the NAS Detector software.
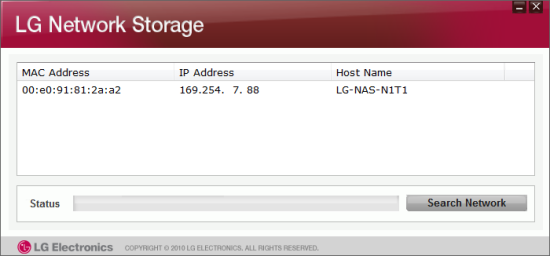
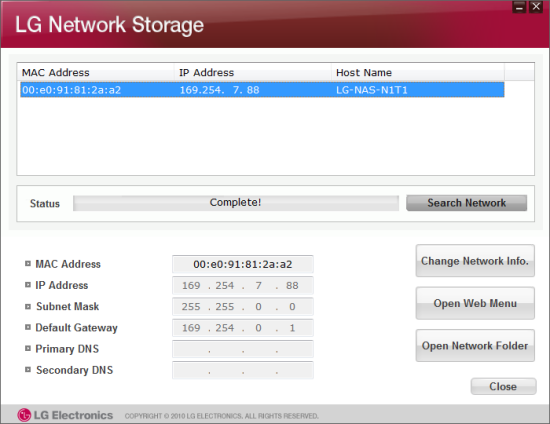
The NAS Detector software searches the network looking for LG NAS devices. When it finds one, it will display its IP address, MAC address and host name. Using the NAS Detector software, you can also change the network information, open the web menu or access the network folder.
With the network interface configured, you access the web menu by entering the N1T1's IP address into your web browser's address bar. Initially, you will need to login using the default administrator account. The user ID is ‘admin’ and the initial password is ‘admin’.

The web menu lets you view information about the system and change its settings. It also offers share and service management as well as menus to backup data to and from optical discs and USB devices.

First, we'll take a look at the System Settings. This menu lets you configure things like the N1T1's network connection, hard drive and power settings. You can also setup mail notifications and update the firmware of the system and DVD drive.
Network:
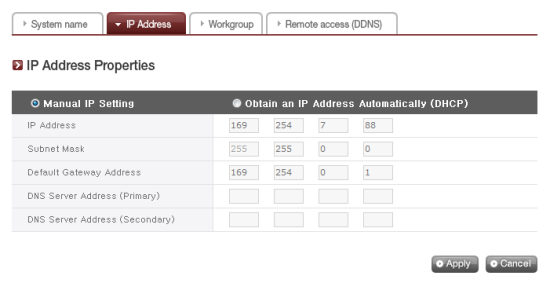
The network settings are pretty straight forward. From here, you can designate a custom system name and description as well as change the IP address properties.

Using Dynamic DNS (DDNS), you can connect to the LG N1T1 by its domain name in environments where the IP may change over time. The service monitors the IP address and maps it to a domain name in real time. Instead of using a well known service like DynDNS.com, LG has implemented their own. To use this service, enable it through the web menu and provide a domain name and password.
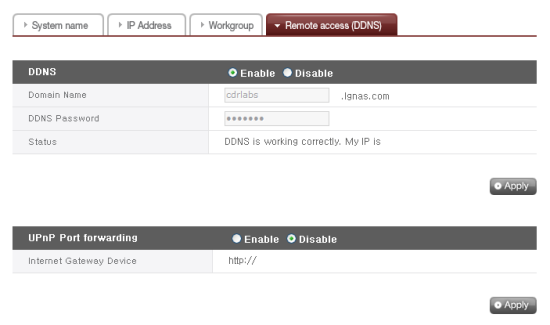
As you can see, the N1T1 also supports UPnP port fowarding. When enabled, the NAS will talk to your router and automatically configure it so that its services can be accessed from outside your network.
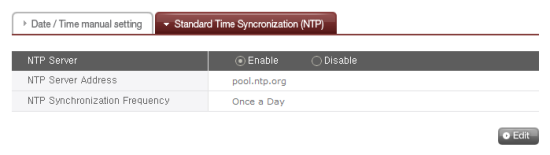
Time:
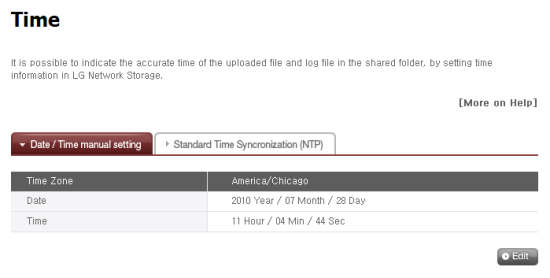
The first time you set up the N1T1, you will need to set the time, date and local time zone. You can also specify an NTP server so that the time is automatically synchronized at set intervals.
Hard Drive:
The Hard Drive menu lets you view the status and capacity of the storage volumes. With there being only one hard drive, there is no RAID configuration. However, you can adjust the size of the NTFS volume that is accessible when the N1T1 is configured as an external hard drive.

By default, the external hard drive volume (x-hdd) accounts for only 10% of the N1T1's total capacity. Clicking on the "HDD Format" button will activate a slider bar where you can adjust the size of the volume. The size of the external hard drive can be set anywhere from 10GB up to 400GB in 10GB increments.
t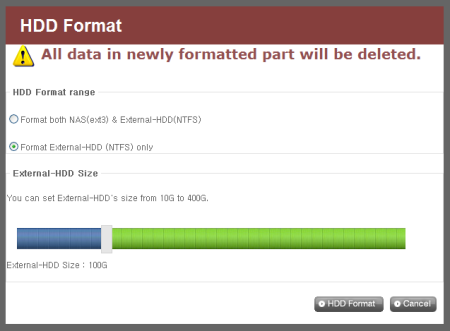
The N1T1 also supports a new feature called Active BSR (Bad Sector Recovery). When a user accesses a file on the hard drive, Active BSR looks for bad sectors and remaps them to a new location.

Selective Mirror:
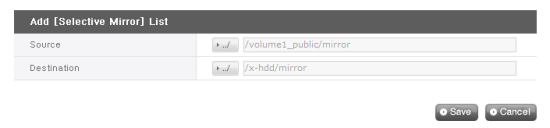
The Selective Mirror function automatically generates copies of certain folders, which allows data recovery even after the loss of source data. If SMB (Samba) or FTP is used to store data on the N1T1 and a change incurs in the source folder, the same change will be applied to the destination folder.

When adding a new mirror, you will need to select the source folder that will be backed up as well as the destination folder where the data will be saved.
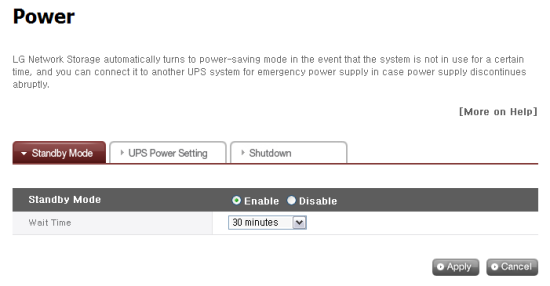
Power:
When the volumes on the N1T1 have not been accessed for a given amount of time, the hard disks will enter standby mode to minimize power consumption. The standby mode can be adjusted or disabled altogether through the Power menu.
The N1T1 can also communicate directly with an APC style USB UPS and power itself down in the event of a power failure.

Last but not least, the N1T1 can be restarted and shutdown remotely through the Power menu.

Firmware:
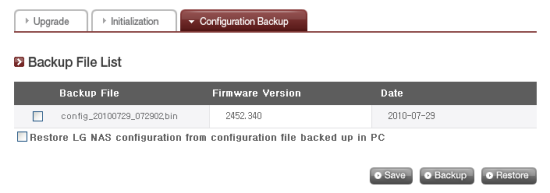
Firmware for the N1T1 and its optical disc drive can be downloaded from LG's website and updated through the web menu. Before doing so, it is highly recommended that you backup your current configuration.
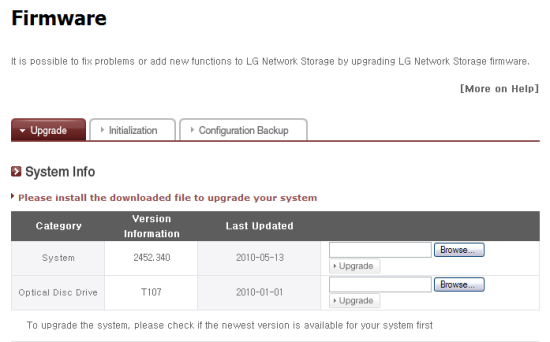
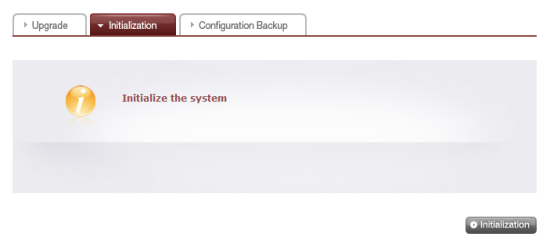
If the firmware upgrade goes wrong or you want to start totally over, the N1T1 can be restored back to its factory settings. Take note that this will delete all of the data stored on the volumes.
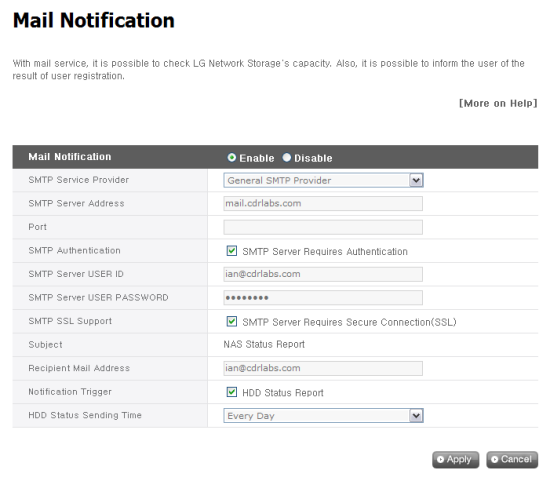
Mail Notification:
If you don't want to login to the web menu to check the status of the N1T1, you can have it send you a periodic status report. To set this up, enter the SMTP server address, SMTP authentication information and the recipient's email address.
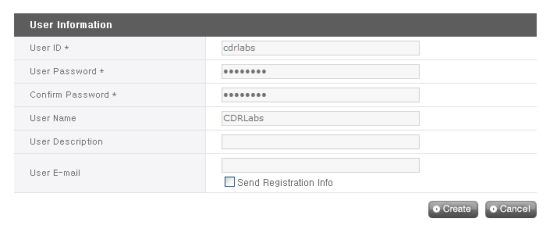
Once you have the N1T1 configured, you'll need to setup the shares and create some users and groups. To manage your user accounts, click on the User option under the Share Settings menu. From here you can view and edit your existing user accounts as well as create new ones.

To create a new user, you'll need to enter a unique user ID and password. To make it easier to manage accounts, you can also enter the user's full name and email address as well as a short description.
The Group option is pretty straightforward. From here, you can create and delete groups as well as add and remove users.
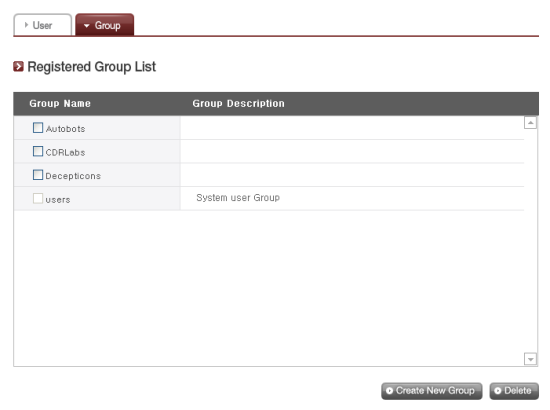

My only real complaint with the N1T1's user and group management tools is that you cannot give administrator rights to users. If you want to change any settings or create additional new user accounts, you need to login with the default admin account.
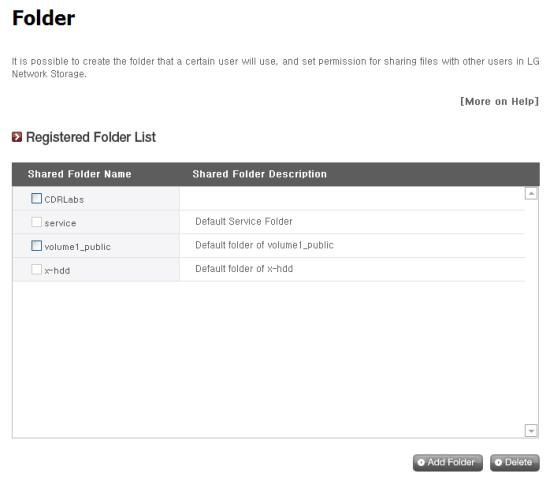
By default, the N1T1 has a number of shared folders for things like its DVD drive, services and data backups. You can also create your own using the Share option in the Share Settings menu.
Clicking on the Share option will bring up the screen shown below. From here, you can create and delete folders as well as change their attributes and authorization settings.
To create a new folder, you will need to specify a name, select the volume where it will be created and select the protocols (SMB, AFP, FTP and WebDav) it supports. You can also choose to hide the folder from the network search and create a recycle bin for deleted files.
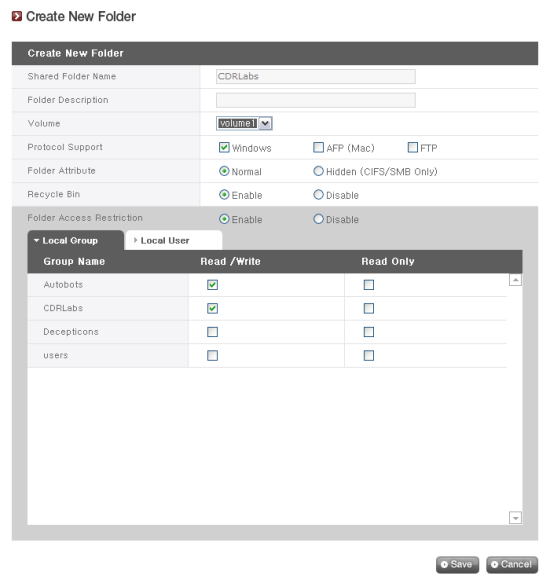
The last thing you need to do is specify which users and groups can read and write to the folder. These restrictions can also be disabled, giving full access to all users.
The N1T1's sharing capabilities aren't limited to the internal volumes. External hard drives and flash drives attached to its USB port are automatically shared and can be accessed by anyone with an account on the device.

The N1T1 offers support for a number of services, including FTP and AFP servers, network printing, iTunes music server, DLNA media server and torrent file sharing.
File Server:
Like most NAS devices, the N1T1 features a built-in FTP server. Using the File Transfer Protocol (FTP), you can download or upload files from a remote location. To use the FTP service, enable it through the web menu and specify the port it should listen on. If you haven't already, you will also need to go in and give users permission to access folders via FTP.
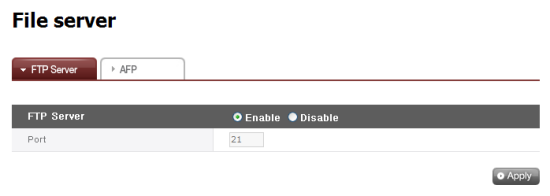
The N1T1 also features support for the Apple Filing Protocol (AFP). Unless you have older Macs running Mac OS 9 or earlier, you're better off using Windows File Sharing (SMB/CIFS).

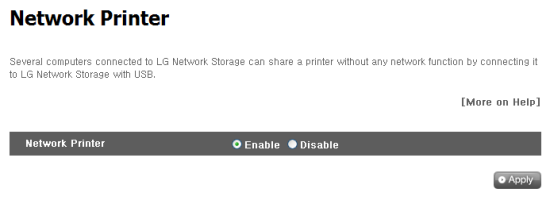
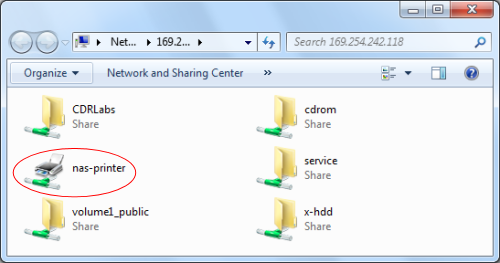
Network Printer:
The N1T1 can also function as a network print server that can be used by both Macs and PCs on the network. To do this, you will need to plug a printer into one of the USB ports and enable the service through the web menu.
iTunes Music Server:

Before new tracks are recognized, the library will need to be updated. The N1T1 can perform this task automatically, or you can do it manually through the web menu. Once updated, they will show up in your iTunes software.

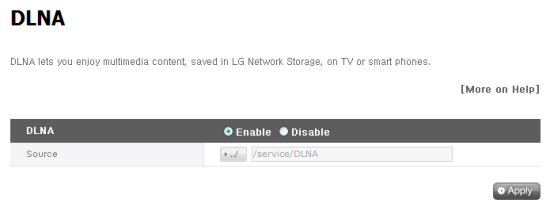
DLNA Media Server:
While the N1T1's iTunes server can stream music, its DLNA (Digital Living Network Alliance) media server allows you to share other digital content, such as photographs and movies, with devices on your network. To use the DLNA service, enable it on the N1T1 and select a folder where the multimedia files are stored.
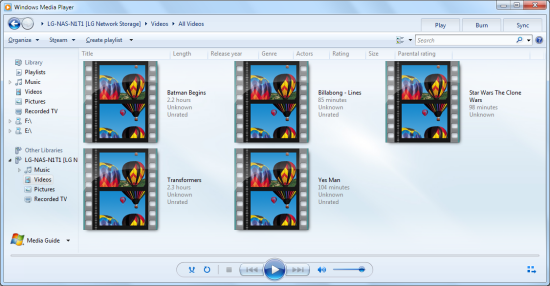
While its not clear whether or not the N1T1 is DLNA-certified, LG does state that the device is compliant with the standard for a Digital Media Server (DMS). To see how well this service worked, I tried watching a few movies through Windows Media Player in Windows 7 as well as my PS3. In both cases, the N1T1 worked flawlessly.
Torrent:
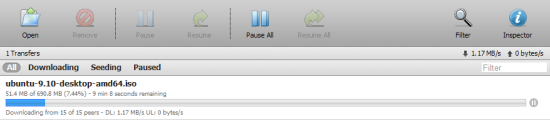
Last but not least, the N1T1 features a built in Torrent download service. To access the Torrent program administration window, click on the Torrent icon on the top of the web menu. From here you can manage your downloads or start a new one by uploading a Torrent file or entering an URL to one. When the download is complete, the file is automatically placed in the Torrent folder located within the service share.

As I mentioned earlier, the N1T1 can be used to backup USB storage devices such as flash drives and external hard drives. If you'd like to make a quick backup, you can simply connect the USB device to the NAS and push the "backup" button on the front of the device.
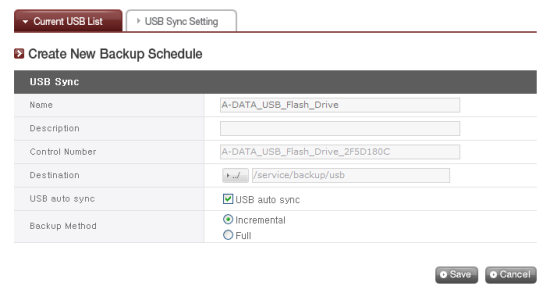
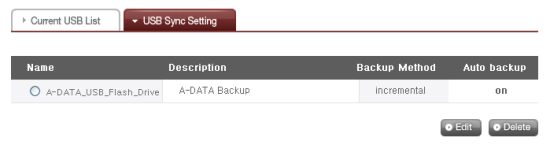
Otherwise, you can backup your USB devices using the USB Backup option under the File backup service menu. If your USB device is already connected to the NAS, it will show up in the list of devices. Select the one you want to backup and click on the "Create" button.

For the second step, you will need to enter a name and description and specify a destination if you want to store your backup somewhere other than the default location. You can also choose to have the N1T1 automatically sync your USB device every time it is connected. Lastly, you'll need to select a backup method (Incremental or Full).
Unfortunately, the N1T1 does not include a function to transfer data between USB devices and the NAS. This was a useful feature on the N4B1 and I'm disappointed to see that LG did not include it here as well.
The N1T1's most unique feature is its built-in DVD writer. Using this drive, you can copy content from discs and backup data stored on the NAS.

Looking at the screenshot above, you can see that the drive in the N1T1 is LG's slim, slot-loading Super Multi drive, the GA31N.
Backing up a CD or DVD is fairly straight forward. Simply insert the disc into the slot on the front of the N1T1 and press the "backup" button. The device can be configured to do a data backup, which will copy the individual files on the disc, or create an image file (.iso or .bin/.cue). When the backup is done an alarm will sound and the disc will automatically be ejected.

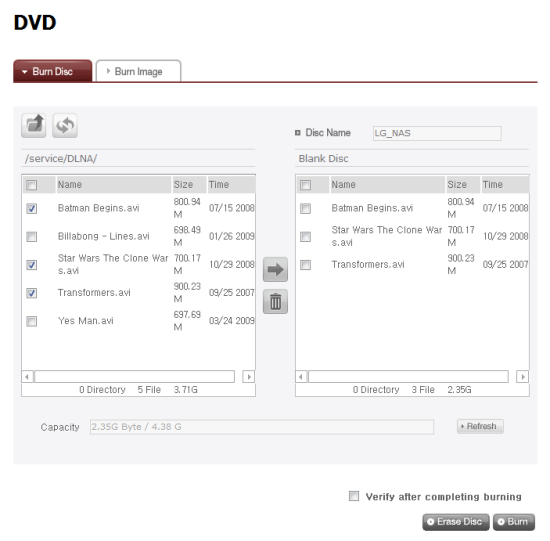
The N1T1 also has the ability to burn individual files and folders to CD and DVD. To do so, click on the DVD option located under the File backup service menu. When burning a disc, the NAS folders are displayed on the left window and folder structure of the disc compilation on the right. Selected files and folders can be added and removed using the arrow and trash can buttons.
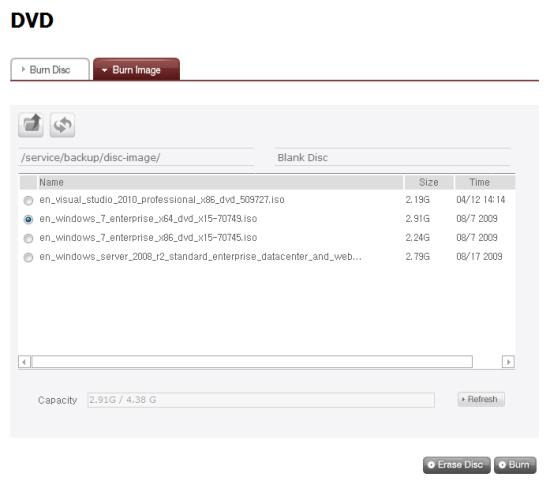
Burning disc images is possible as well using the Burn Disc option. To do so, go to the folder where your images are stored and select the one you want to burn to disc.
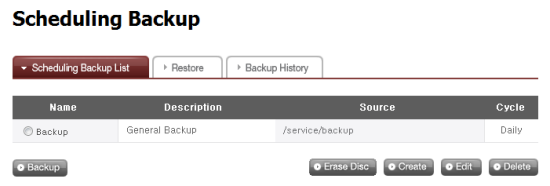
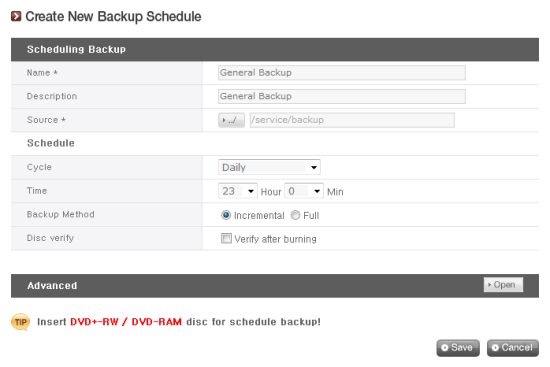
Thanks to the N4B1's built-in DVD writer, performing scheduled backups is a very simple task. When creating a new backup, you will need to enter a name and description and select the folder on the NAS that you want to backup. You'll also need to specify a schedule and select a backup method (Incremental or Full).
LG has also included a function to restore backed up data. Entire folders or individual files can be restored from backup and when there are multiple versions, the latest file or all files can be selected and unselected.
As I mentioned earlier, the N1T1 can be used as an external DVD writer. When connected to a computer via USB, the device shows up in the Device Manager just like any other optical drive. Looking at the Opti Drive Control screenshot, you can see that all of its features and write modes are recognized correctly.
 |
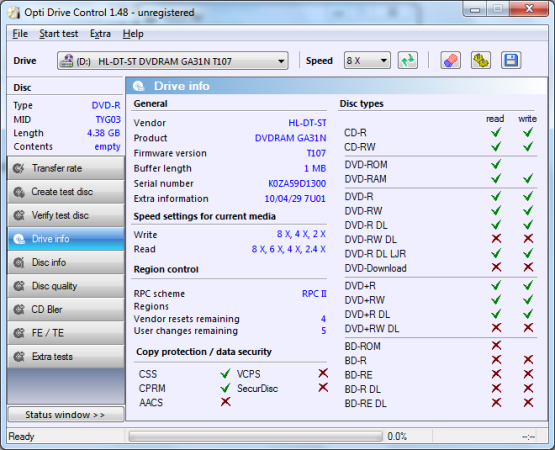 |
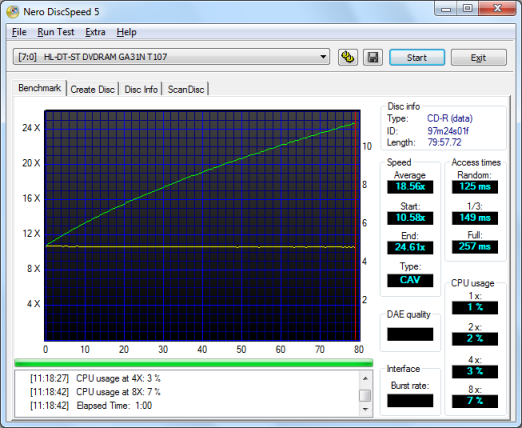
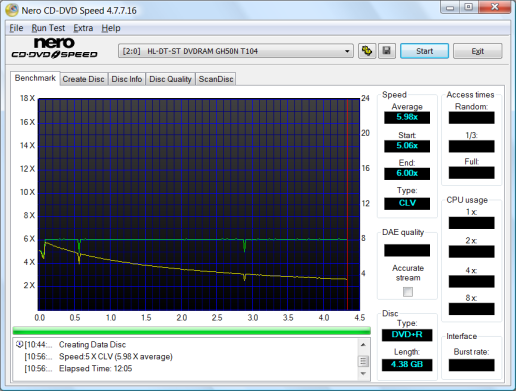
To see how well the N1T1 performed as a DVD writer, I ran a few simple tests. Looking at the screenshots below, you can see that the device had no problems reading and writing at its rated speeds.
 CD Write |
 CD Read |
 DVD Write |
 DVD Read |
The test system used in this review was an HP dc7900. The computer came equipped with an Intel Core 2 Duo E8400 3.0GHz CPU, 2GB of DDR2 800MHz memory, Seagate Barracuda 7200.10 ST3250310AS 250GB SATA hard drive, NVIDIA Quadro FX570 256MB PCIe graphics card and Intel 82567LM-3 gigabit network card. For the operating system, I installed a fresh copy of Windows 7 Enterprise.
To test the performance of the LG N1T1, I ran a series of benchmarks using CrystalDiskMark 3.0, ATTO Disk Benchmark 2.34 and Iometer. The tests were first run with the device configured as an NAS and then again in its external hard drive mode. To eliminate any network bottlenecks, the N1T1 was connected directly to the computer using a CAT6 ethernet cable.
CrystalDiskMark 3.0:
First, I ran a few quick tests using CrystalDiskMark. This benchmark tool measures the performance of a storage device by testing its sequential read and write speeds as well as its random read and write speeds using blocks 4KB and 512KB in size. The test was first run using a 100MB file and then a 500MB file.
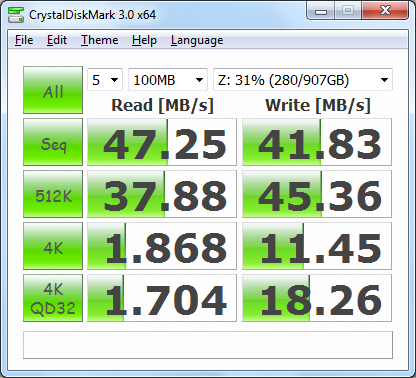 NAS Mode - 100MB |
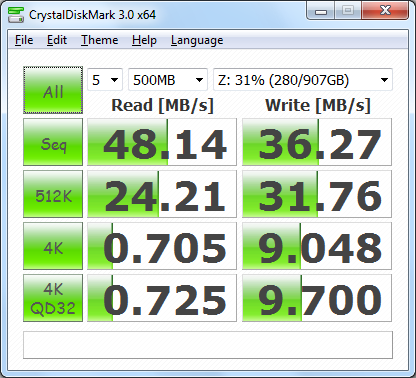 NAS Mode - 500MB |
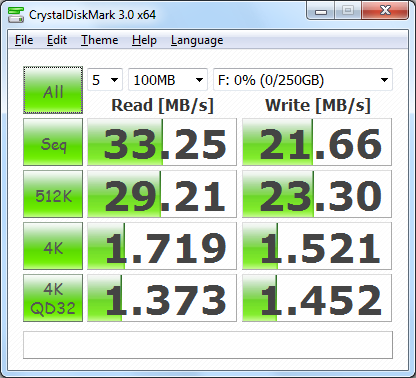 Ext. HDD Mode - 100MB |
 Ext. HDD Mode - 500MB |
The N1T1 performed fairly well when configured as a NAS device. In our tests, it reached speeds as high as 48 MB/s when reading and 41 MB/s when writing. As you can see, the N1T1 wasn't nearly as fast when configured as an external hard drive. When connected to the computer using USB 2.0, the unit reached read and write speeds of 33 MB/s and 21 MB/s, respectively.
ATTO Disk Benchmark 2.34:
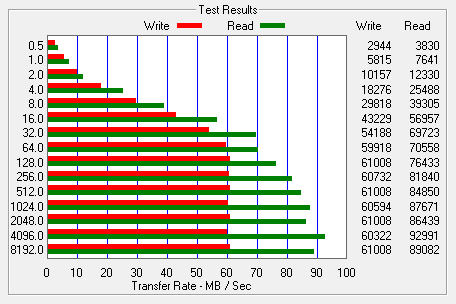
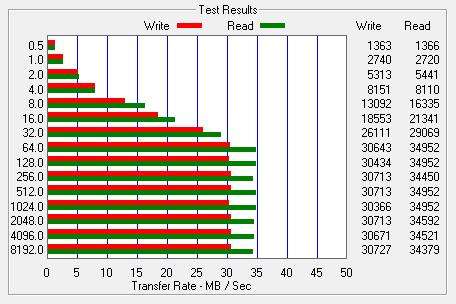
I also used ATTO Disk Benchmark to test the N1T1's sequential read and write speeds. The tests are run using blocks ranging in size from 0.5KB to 8192KB and the total length set to 32MB and 256MB.
 NAS Mode - 32MB |
 NAS Mode - 256MB |
 Ext. HDD Mode - 32MB |
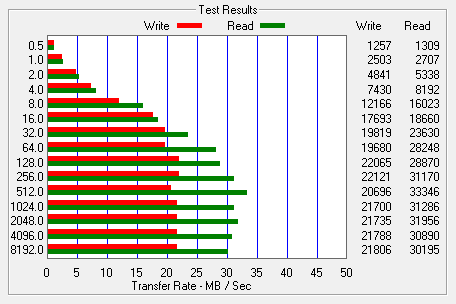 Ext. HDD Mode - 256MB |
When configured as an NAS and the total block length set to 256MB, the N1T1's read speed topped out at about 50 MB/s and its write speed at 39 MB/s.
Iometer:
Lastly, I ran a series of tests using Iometer. This tool can be configured to benchmark a number of things. In this case, I used it to measure the N1T1's sequential read and write speeds using blocks ranging from 512B to 2MB in size.

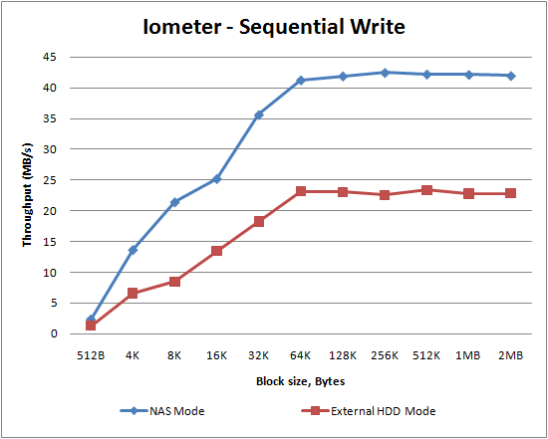
By now, it shouldn't be too surprising that the N1T1 was faster when configured as an NAS. When tested with Iometer, the unit was able to read at speeds as high as 62 MB/s and write at 42 MB/s.
While small in size, the N1T1 delivers the same mix of performance and features we've come to expect from LG's two and four bay NAS devices. The unit is well constructed and comes equipped with a 1TB hard drive that is partitioned for use both as an NAS and an external hard drive. The N1T1 also features a built-in DVD writer, which serves as a secondary storage medium as well as a way to backup a disc's contents so that it can be accessed by many users. To top it all off, LG has included a number of consumer oriented features including USB backup, Apple Time Machine support, Torrent file sharing and a built in DLNA media server.
That being said, the N1T1 isn't perfect. When configured as an external hard drive, only one of the two volumes is accessible. You can mirror files between the two, but things like backups are not accessible by default. The external hard drive performance isn't anything to write home about either. However, this is mostly due to the limitations of the unit's USB 2.0 interface. Also, the N1T1's internal hard drive cannot be removed and with only one USB port, it cannot act as a print server and backup a USB device at the same time.
In the end, it usually comes down to price. For what it offers, LG's new single bay NAS is surprisingly affordable. Available in your choice of black or white, the N1T1 can be picked up for as little as $190 through Amazon as well as some of the vendors on PriceGrabber.
Highs:
- Built-in DVD rewriter
- External HDD and ODD modes
- One touch DVD/CD backup
- One touch and automatic USB backup
- Built-in backup, FTP and print servers
- iTunes music and DLNA media servers
- WebDAV file management
- Apple Time Machine support
- Torrent file sharing
- Gigabit Ethernet NIC
- Easy to use web interface
- Compatible with Windows, Mac OS X and Linux clients
- Good looking and well constructed design
- Quiet operation
- Reasonably priced
Lows:
- Hard drive is not removable
- Only one USB port
- Cannot schedule backups to external hard drives
- Cannot transfer data from the NAS to storage devices
- Administrator rights limited to default admin account
- Only a 1 year warranty